※サンプル・コード掲載
あらすじ
これは感情知能を持つチャットボットを作るシリーズの第2回目です。
このシリーズでは人の感情を読み取るチャットボットを開発します。
Microsoft Emotion APIを使い表情から感情を検出したり、Empath APIを使い話し方(音声入力)から感情を検出したりする方法を学びます。
サマリー
- 人の音声から感情を読み取るサービスについて
- API キーの取得、Angular APPの設定とAPキーのコンフィグレーション
- 解析のためにEmpath APIが必要とする事
- 音声をAPI対応の形式に変換し、音声サンプルをAPIに送信する
- このサービスを使いユーザーがコミュニケ―ションするインターフェースのコンポーネントを作成する
もしこのシリーズの、以下第1回目の記事を読んでなければ先にお読みになることを勧めます。
 顔・表情から感情分析するAIアプリの作り方 Emotion API
人の音声から感情を読み取るサービス
いくつか調べましたが、下記3つがあります。
Empath
声の高低、トーン、スピード、強さ等、物理的な特徴を解析して感情の判定をします。
どの言語にも対応するので言語に頼らないアプリケーションを作るときに最適です。
ここからAPI キーを取得できるのでぜひチェックしてみてください。
BeyondVerbal
これも音声から感情を検出できるサービスですが個人的にはあまりうまく行きませんでした。
いつか成功したら、改めて記事を書きたいと思います。
Watson Tone Analyzer
IBMのTone Analyzer はテキスト文字から感情とコミュニケーション方法を判定するのに最適です。
しかし今回はインプットとして音声を使いたいのです。
Watson Tone Analyzer と音声認識技術を統合する事により、音声の3つの主な側面である感情、社会的傾向、言語スタイルを検出するために言語的な解析ができます。
怒り、恐怖、喜び、悲しみ、嫌悪などの声のトーンを認識する事ができます。
この記事では、Empathの音声感情認識APIを使います。
前提条件
- Angularについての知識があり、Angular CLIを使いSPAを作った事がある。
- AngularCLIで Angularプロジェクトを作るために、全てのDependenciesをインストールしている。
- ng new project-name を使ってプロジェクトを作成してください。
- Empath の音声感情認識APIを使うためにAPI キーが必要です、ここから取得できます。
- 下記の様にenvironment.prod.ts にAPI キーを保管する。
export const environment = {
  production: true,
  apiKeys: {
    'webEmpath': 'your-api-key-here'
  }
};
上記の条件が整ったら準備完了です。
構築手順
1. Empath APIに何を送信するかを理解する
EmpathのアカウントとAPI Keyを取得したら、解析のためにAPIに適切なデータを送信します。
Empath によれば、音声データは以下の条件を満たすことが必要です。
- PCM WAVE フォーマット、16bit
- データサイズ:1.9MB以下
- PCM_FLOAT, PCM_SIGNED または PCM_UNSIGNED フォーマット
- 録音時間:5.0秒未満
- サンプリング周波数:11025 Hz
- チャンネル数:1(モノラル)
そして、以下の3つの機能を実装します。
- 音声の録音機能を提供するプログラム
- 録音された音声を解析するためにAPI対応の形式に変換するユーティリティ
- APIと交信するプログラム
2. 必要なサービスを作る
2-1. Empath サービスを作る
このプログラムによってEmpathの音声感情認識 API と直接交信することが可能になります。
以下の様に、Serviceという名のフォルダに全てのサービスを入れておきます。
ng g s services/webEmpath/webEmpath
サービスができたので、中のメソッドを定義しましょう。
このメソッドはパラメーターとしてフォームデータを取り、必要なPostリクエストをAPIに送信します。
import { Injectable } from '@angular/core';
import { HttpClient, HttpHeaders } from '@angular/common/http';

@Injectable()
export class WebEmpathService {

  apiUrl: string = 'https://api.webempath.net/v2/analyzeWav';

  constructor(private http: HttpClient) {}

  getUserEmotion(formData) {
    let headers = new HttpHeaders();
    headers = headers.set('Content-Type', 'multipart/form-data');
    return this.http.post(this.apiUrl, formData);
  }

}
2-2. AudioUtil Serviceを作る
録音された音声をAPI対応の形に変換します。
そのために必要なメソッドをこのUtilの中に入れます。
ng g s services/audioUtil/audioUtil.
ここで必要な機能を考えます。
録音状態をイニシャライズする機能、データのバッファを録音する機能、その録音されたデータを設定したBlobにエクスポートする機能です。
サービス外からアクセスできるこの3つの機能以外は、実際にバッファを統合する幾つかのプライベート機能が必要です。
インターリーブしてPCMWave形式に変換します。
音声分析とフォーマット変換はこの記事の範囲外なので、単純にaudio-util.service.ts はこのように見えます。
import { Injectable } from '@angular/core';

@Injectable()
export class AudioUtilService {

  private recLength = 0;
  private recBuffers = [];
  private sampleRate;
  private numChannels;

  /** Private Methods **/

  initBuffers() {
    for (let channel = 0; channel  this.numChannels; channel++) {
      this.recBuffers[channel] = [];
    }
  }

  mergeBuffers(recBuffers, recLength) {
    let result = new Float32Array(recLength);
    let offset = 0;
    for (let i = 0; i  recBuffers.length; i++) {
      result.set(recBuffers[i], offset);
      offset += recBuffers[i].length;
    }
    return result;
  }

  interleave(inputL, inputR) {
    let length = inputL.length / 4;
    let result = new Float32Array(length);

    let index = 0, inputIndex = 0;

    while (index  length) {
      result[index++] = 0.25 * (inputL[inputIndex++] + inputL[inputIndex++] +
        inputL[inputIndex++] + inputL[inputIndex++]);
    }

    return result;
  }

  floatTo16BitPCM(output, offset, input) {
    for (let i = 0; i  input.length; i++ , offset += 2) {
      let s = Math.max(-1, Math.min(1, input[i]));
      output.setInt16(offset, s  0 ? s * 0x8000 : s * 0x7FFF, true);
    }
  }

  writeString(view, offset, string) {
    for (let i = 0; i  string.length; i++) {
      view.setUint8(offset + i, string.charCodeAt(i));
    }
  }

  encodeWAV(samples) {
    let buffer = new ArrayBuffer(44 + samples.length * 2);
    let view = new DataView(buffer);

    /* RIFF identifier */
    this.writeString(view, 0, 'RIFF');
    /* RIFF chunk length */
    view.setUint32(4, 36 + samples.length * 2, true);
    /* RIFF type */
    this.writeString(view, 8, 'WAVE');
    /* format chunk identifier */
    this.writeString(view, 12, 'fmt ');
    /* format chunk length */
    view.setUint32(16, 16, true);
    /* sample format (raw) */
    view.setUint16(20, 1, true);
    /* channel count */
    view.setUint16(22, 1, true);
    /* sample rate */
    view.setUint32(24, this.sampleRate, true);
    /* byte rate (sample rate * block align) */
    view.setUint32(28, this.sampleRate * 4, true);
    /* block align (channel count * bytes per sample) */
    view.setUint16(32, this.numChannels * 2, true);
    /* bits per sample */
    view.setUint16(34, 16, true);
    /* data chunk identifier */
    this.writeString(view, 36, 'data');
    /* data chunk length */
    view.setUint32(40, samples.length * 2, true);

    this.floatTo16BitPCM(view, 44, samples);

    return view;
  }

  /** Public Methods **/

  init(config?) {
    this.sampleRate = 11025;
    this.numChannels = config.numChannels || 2;
    this.initBuffers();
  }

  record(inputBuffer) {
    for (let channel = 0; channel  this.numChannels; channel++) {
      this.recBuffers[channel].push(inputBuffer[channel]);
    }
    this.recLength += inputBuffer[0].length;
  }

  exportWAV(type) {
    let buffers = [];
    let interleaved;
    for (let channel = 0; channel  this.numChannels; channel++) {
      buffers.push(this.mergeBuffers(this.recBuffers[channel], this.recLength));
    }
    if (this.numChannels === 2) {
      interleaved = this.interleave(buffers[0], buffers[1]);
    } else {
      interleaved = buffers[0];
    }
    let dataview = this.encodeWAV(interleaved);
    let audioBlob = new Blob([dataview], { type: type });

    return audioBlob;
  }

}
2-3. 録音プログラムを作る
この録音サービスを作る主な目的は、window オブジェクトの上にRecorderという名のAPIを配置し利便性を高めることです。
特定のイベントが起こった時に呼ばれるメソッドが自動的に呼びだされる方が便利です。
これはservicesフォルダの中のプログラムです。以下のように作ります。
ng g s services/recorder/recorder.
これは、Recorder API をロードして window オブジェクトに付けるreaderの機能を含んでいます。
これにより、RecorderAPIにapp.component.ts.からアクセスできます。
この録音APIはaudio-util.service.tsからパブリックメソッドを内部利用します。
録音が始まりイニシャライズしている間と録音が終了したときにこのメソッドは呼ばれます。
この音声APIはNodeのonaudioprocess上のrecordメソッドを呼ぶことによりAudioUtilにバッファをプッシュし続けます。
録音の状態をチェックするためにRecordingという名のBブーリアン 変数を保持します。
(ScriptProcessor Nodeの作成など、他の事も多々ありますが、それはこの記事の範囲外なので省略します。)
以下の様なサービスができます。
import { Injectable } from '@angular/core';

import { AudioUtilService } from '../audio-util/audio-util.service';

@Injectable()
export class RecorderService {

  constructor() { }

  init() {
    let Recorder = function (source, cfg) {
      let config = cfg || {};
      let bufferLen = config.bufferLen || 4096;
      let numChannels = config.numChannels || 2;
      this.context = source.context;
      this.node = (this.context.createScriptProcessor || this.context.createJavaScriptNode).call(this.context, bufferLen, numChannels, numChannels);
      this._audioUtil = new AudioUtilService();
      this._audioUtil.init({ sampleRate: this.context.sampleRate, numChannels: numChannels });

      let recording = false, currCallback;

      this.node.onaudioprocess = (e) => {
        if (!recording) return;
        let buffer = [];
        for (let channel = 0; channel  numChannels; channel++) {
          buffer.push(e.inputBuffer.getChannelData(channel));
        }
        this._audioUtil.record(buffer);
      }

      this.record = function () {
        recording = true;
      }

      this.stop = function () {
        recording = false;
      }

      this.exportWAV = (cb, type) => {
        currCallback = cb || config.callback;
        type = type || config.type || 'audio/wav';
        if (!currCallback) throw new Error('Callback not set');
        currCallback(this._audioUtil.exportWAV(type));
      }

      source.connect(this.node);
      this.node.connect(this.context.destination);    //this should not be necessary

    };

    (window).Recorder = Recorder;
  }

}
3. インターフェイスを作る
3-1. Makeupから始めます
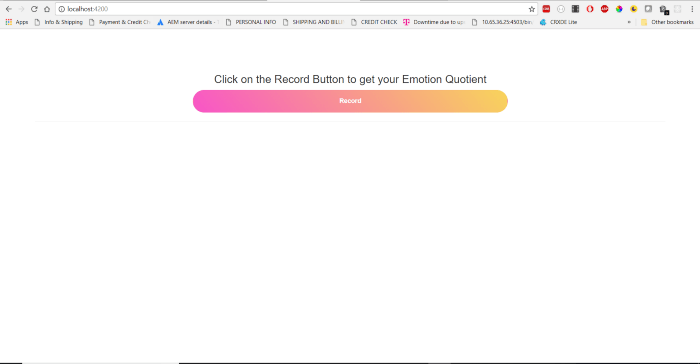
ユーザーがクリックして声の録音を開始するbuttonが必要です。
preタグで表示します。
<div class="center">
<h3>Click on the Record Button to get your Emotion Quotient</h3>
<button class="btn record-btn" (click)="startRecognition()">Record</button>
<hr>
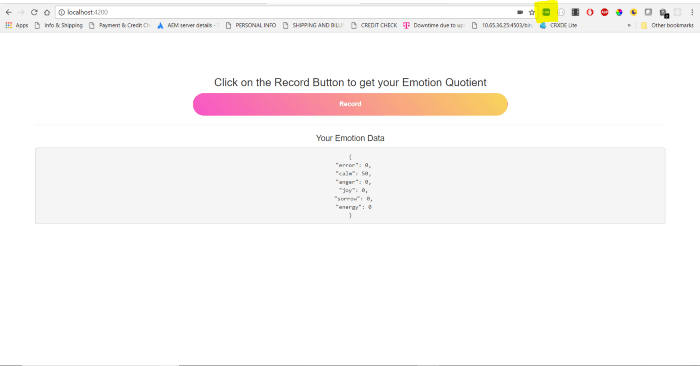
<div *ngIf="emotionData">
<h4>Your Emotion Data</h4>
<pre>{{ emotionData | json }}</pre>
</div>
</div>3-2. ボタンをデザインします
.center {
    text-align: center;
    padding: 5%;
}

.record-btn {
    border-radius: 10em!important;
    background: linear-gradient(50deg,#F855C8,#F8D55B)!important;
    color: white!important;
    width: 50%!important;
    height: 50px!important;
    font-weight: bolder!important;
}
Webページがこの様になります。
3-3. コンポーネントクラスを構築
Makeupの中にEmpath APIからのレスポンスである、emotionDataがあります。
startRecognitionという名のクリックハンドラーもあります。
これをcomponentクラスに加えます。
3-3-1
app.component.ts.を開き下記のようにDependenciesをインポートします。
import { Component, ChangeDetectorRef, OnInit } from ‘@angular/core’;
import { environment } from ‘environments/environment.prod’;
import { RecorderService } from ‘./services/recorder/recorder.service’;
import { WebEmpathService } from ‘./services/web-empath/web-empath.service’;
3-3-2
componentクラスに幾つかのプロパティを加えます。
recognition; audioContext; analyser; recorder; emotionData;
3-3-3
RecorderService、WebEmpathService と ChangeDetectorRef をdependenciesとして挿入します。
3-3-4
アプリのComponentクラスはOnInit インターフェースをインプリメントしハンドラーをngOnInit コンポーネント・ライフサイクル・フックのために定義します。
3-3-5
ngOnInitの中で、recognition、audioContext、analyser を初期化します。
this.recognition = new (window).webkitSpeechRecognition();
this.audioContext = new AudioContext;
this.analyser = this.audioContext.createAnalyser();
3-3-6
Componentクラス上の全てのプロパティを初期化したら、_recorderService上のInitを呼び出します。
this._recorderService.init.call(this);
これにより RecorderService上のinitメソッドが呼び出され、thisの値が設定されます。
3-3-7
startRecognition とanalyzeVoiceメソッドを定義します。
  startRecognition() {
    this.recognition.start();
    this.analyzeVoice();
    this.recognition.onresult = event => {
      this.recorder.stop();
      this.recorder.exportWAV((blob) => {
        let formData: FormData = new FormData();
        formData.append('apikey', environment.apiKeys.webEmpath);
        formData.append('wav', blob);
        this._webEmpathService.getUserEmotion(formData).subscribe(response => {
          this.emotionData = response;
          this._cdRef.detectChanges();
        });
      }, 'audio/wav');
    }
  }

  analyzeVoice() {
    navigator.getUserMedia(
      {video: false, audio: true},
      stream => {
        let input = this.audioContext.createMediaStreamSource(stream);
        this.recorder = new (window).Recorder(input);
        input.connect(this.analyser);
        this.recorder.record();
      },
      e => {
        alert("Voice input is not available.");
      }
    );
  }
3-4. 解説
Record ボタンをクリックすると startRecognitionメソッドをトリガーします。
これにより音声認識、analyzeVoiceを暗黙的にトリガーします。
analyzeVoice はgetUserMedia メソッドから取ったストリームにaudio Contextをセットします。
Windowオブジェクト上に当初設定したレコーダーのインスタンスを作成します。
そしてアナライザーにストリームソースを接続します。
最後にrecorderインスタンス上にrecordメソッドを呼び出します。
認識は並行処理されています。
認識が済んだことは、recognitionオブジェクトのonresultイベントによって知ることができます。
ここでrecorderオブジェクトのexportWAVメソッドを呼び録音を終了します。
このメソッドは対応フォーマットのBlobでコールバックを受けます。
WebEmpathService のgetUserEmotion メソッドを呼んで感情データを受け取ります。
データを受け取ったら、componentのemotionDataプロパティへのレスポンスをを指定して ChangeDetectorRef のdetectChangeを呼びます。
するとemotionDataプロパティの変更もテンプレートに反映されます。
上記の変更後、app.component.ts はこのようになるはずです。
import { Component, ChangeDetectorRef, OnInit } from '@angular/core';

import { environment } from 'environments/environment.prod';
import { RecorderService } from './services/recorder/recorder.service';
import { WebEmpathService } from './services/web-empath/web-empath.service';

@Component({
  selector: 'app-root',
  templateUrl: './app.component.html',
  styleUrls: ['./app.component.css']
})
export class AppComponent implements OnInit {

  recognition; audioContext; analyser; recorder; emotionData;

  constructor(
    private _recorderService: RecorderService,
    private _webEmpathService: WebEmpathService,
    private _cdRef: ChangeDetectorRef
  ) { }

  ngOnInit() {
    this.recognition = new (window).webkitSpeechRecognition();
    this.audioContext = new AudioContext;
    this.analyser = this.audioContext.createAnalyser();
    this._recorderService.init.call(this);
  }

  startRecognition() {
    this.recognition.start();
    this.analyzeVoice();
    this.recognition.onresult = event => {
      this.recorder.stop();
      this.recorder.exportWAV((blob) => {
        let formData: FormData = new FormData();
        formData.append('apikey', environment.apiKeys.webEmpath);
        formData.append('wav', blob);
        this._webEmpathService.getUserEmotion(formData).subscribe(response => {
          this.emotionData = response;
          this._cdRef.detectChanges();
        });
      }, 'audio/wav');
    }
  }

  analyzeVoice() {
    navigator.getUserMedia(
      {video: false, audio: true},
      stream => {
        let input = this.audioContext.createMediaStreamSource(stream);
        this.recorder = new (window).Recorder(input);
        input.connect(this.analyser);
        this.recorder.record();
      },
      e => {
        alert("Voice input is not available.");
      }
    );
  }

}
以上です、アプリを試してみましょう。
3-5. 注意
データを取得しましたがまだ2つほど問題があります。
1. APIをヒットしようとするとCORSエラーが出ます
それはCross Origin Requests の送信が許可されないのかもしれません。
これはPOSTコールで、Empath APIがJSOMPをサポートしているか分からないので、これを成功されるための方法を探さなくてはなりません。
今のところは必要なヘッダーを手動で加えるChrome Plugin(上記のスクリーンショットでハイライトされています)をインストールし、成功しました。
しかしこのAPIをクライアント・ソリューションのために使うならこれは解決策ではありません。
2. 多くの場合、APIはひとつの感情に対して最高値を与え、その他には0を与えます
これは正しくありません。
上記2つの問題について理想的にはEmpathチームに連絡するべきですがまだしていません。
しかしこのためにあなたの作業を止めることはありません。
もし何か解決策が見つかったら下にコメントをして他の読者に情報提供してください。
こちらがGitHubです。
これでこの記事とシリーズは終わりです、沢山の学びがあれば幸いです。
原文
チャットボットライフとの提携により、翻訳し掲載しています。
チャットボットライフとは、最新のボット、AI、NLP、ツール等を扱うメディアです。