※サンプル・コード掲載
1. pix2pixとは?
昨年、pix2pixという技術が発表されました。
概要としては、それまでの画像生成のようにパラメータからいきなり画像を生成するのではなく、画像から画像を生成するモデルを構築します。
DCGANと呼ばれる画像生成の技術を使用しており、使い方としては、白黒写真からカラー写真を生成したり、線画から写真を生成したりといったことが可能です。
2. DCGANとは?
DCGANとは、画像生成器と画像判別器があり、画像生成器は訓練データに出てくるような画像を生成します。
画像判別機は、訓練データの画像なのか、画像生成器から作られたデータなのかを判別するものです。
そして、画像生成器は、自身が生成した画像だと見破られないように自身の重みを更新していきます。
また、画像判別機は画像生成器が生成した画像なのか、そうでないのかを学習して自身の重みを更新します。
これを繰り返し交互に行うことによって、画像生成器は最終的に訓練データと同じような画像を生成するモデルになります。
つまり、GANを使うと訓練データと似たデータを生成することが出来るということです。
今までご紹介してきたディープラーニングの使い方は訓練データでモデルを作成し、そのモデルで新しいデータに対して何かパラメータを推定するという使い方が多かったと思いますので、これまでとは少し使い方が異なります。
DCGANとは、GANを画像系のディープラーニングでおなじみのCNNを使って構築するモデルとなります。
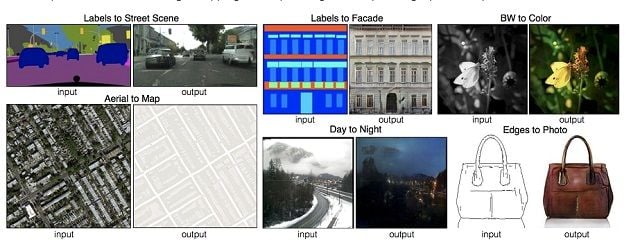
引用:https://github.com/phillipi/pix2pix
3. pix2pixのkerasでの実装方法
今回はこちらのgithubのソースを参考に生成していきたいと思います。
https://github.com/pfnet-research/chainer-pix2pix
3-1. opencv+pythonで画像の準備
3-1-1. 画像のダウンロード
前回の記事: scikit-learn(機械学習)の推定器:Estimatorの選び方 と同じように、bingから魚のイメージを引っ張ってきます。
今回は500枚程度用意してみました。
3-1-2. openCV+pythonで画像の切り抜きとリサイズ
今回は画像のサイズを揃える必要があるので、下記関数を作成し、まず画像サイズを正方形にしました。
アスペクト比は変わらないようにしています。
images/original に対象の画像を入れてから実行して下さい。
def resize_rectangle_img(from_dir,to_dir,size=None):
    import os
    import cv2
	files = os.listdir(from_dir)

    for file in files:

        # 画像の読み込み
        img = cv2.imread(from_dir+file, 1)

        # 読み込んだ画像の高さと幅を取得
        height = img.shape[0]
    	width = img.shape[1]
    	x1 = y1 = 0
        x2 = width
    	y2 = height
    	diff = abs(height - width)
        if height > width:
        	y1 = int(diff/2)
        	y2 = height - y1
        elif width>height:
        	x1 = int(diff/2)
        	x2 = width - x1
    	img = img[y1:y2,x1:x2]

        if size!=None:
        	img = cv2.resize(img,(size,size))

    	cv2.imwrite(to_dir+file, img)
if __name__ == '__main__':
    resize_rectangle_img('images/original/','images/resized/')
3-1-3. 画像の輪郭を取得する
opencvの機能を使い、画像の輪郭を抽出し、白黒の手書きの絵のような画像に変換していきます。
輪郭の取得にはCannyアルゴリズムを使用します。
def main():
	files = os.listdir('images/original/')
    for file in files:
        print(file)
    	save_canny_img('images/resized/'+file,'images/canny/'+file)

def save_canny_img(from_path,to_path):
	img = cv2.imread(from_path)
    canny_img = cv2.Canny(img, 200, 300,apertureSize=3)
	cv2.imwrite(to_path, canny_img)
if __name__ == '__main__':
    main()
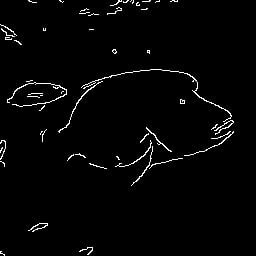
下記の用な画像がimages/cannyのフォルダ内に入ります。
3-1-4. トレーニングデータと評価用データを分ける
以下のコードを使用して、画像をトレーニング用途評価用に9:1くらいで分けます。
import shutil
import random
def split():

	files = os.listdir('images/resized/')
    for file in files:
    	rand_num = random.random()
        if rand_num < 0.9:
        	shutil.copy('images/resized/'+file,'images/set/train/base/'+file)
        	shutil.copy('images/canny/'+file,'images/set/train/label/'+file)
        else:
        	shutil.copy('images/resized/'+file,'images/set/test/base/'+file)
        	shutil.copy('images/canny/'+file,'images/set/test/label/'+file)
if __name__ == '__main__':
    split()
3-2. DCGANのトレーニング
今回は入力がグレースケールなので、githubにあるファイルの一部を書き換えます。
修正するのは主にチャンネルの箇所です。
facade_dataset.py
from PIL import Image
import os
import numpy as np


from chainer.dataset import dataset_mixin

class FacadeDataset(dataset_mixin.DatasetMixin):
    def __init__(self, dataDir='./facade/base',labelDir='./facade/label'):
        self.dataset = []
        #labelが入力画像、baseが教師出力画像
        files = os.listdir(dataDir)
        for file in files:
        	img = Image.open(dataDir+file)
        	label = Image.open(labelDir+file)
        	label = label.convert(mode="RGB")
        	img = np.asarray(img).astype("f").transpose(2,0,1)/128.0-1.0
            label = np.asarray(label).astype("f").transpose(2,0,1)/128.0-1.0


            self.dataset.append((img, label))

        print("load dataset done")

    def __len__(self):
        return len(self.dataset)

    def get_example(self, i, crop_width=256):
        return self.dataset[i][1], self.dataset[i][0]
train_facade.py
...
enc = Encoder(in_ch=3)
dec = Decoder(out_ch=3)
dis = Discriminator(in_ch=3, out_ch=3)
...
facade_visualizer.py
...
in_ch = 3
out_ch = 3
...
for i in range(3):
	x[:,0,:,:] += np.uint8(15*i*in_all[:,i,:,:])
...
では実際にトレーニングを開始します。
各イテレーションの時の結果は下記となります。
今回はサンプルとして下記のサイトから画像を引用させて頂きました。
https://secure.royalcaribbean.com/cruises/5NightFrenchDutchAdventureCruise-ID05Q020?currencyCode=USD&sCruiseType=CO&sailDate=10%2F20%2F2018
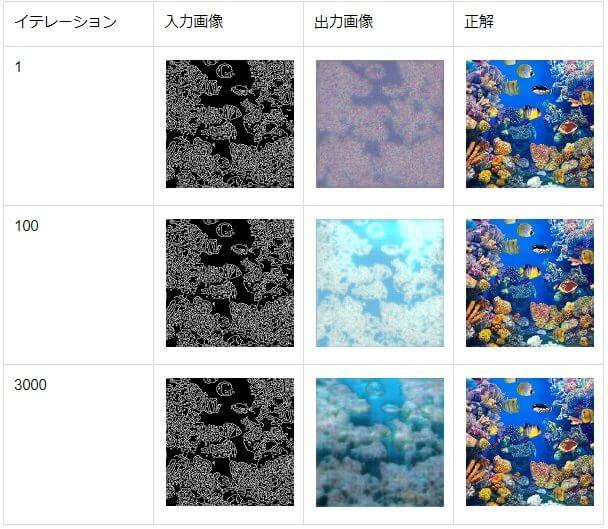
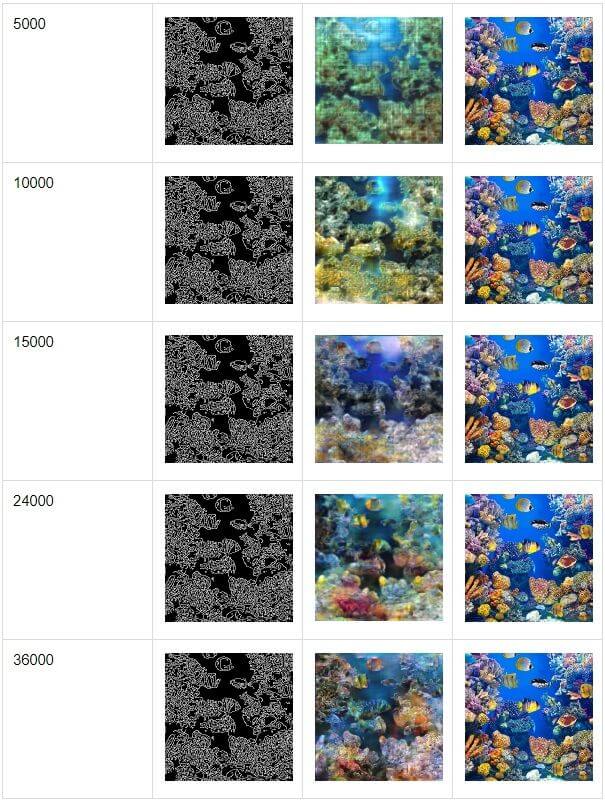
最後の方になると美しい珊瑚礁の様な出力になっていることがわかります。
これは学習の回数をもう少し増やすことによって更に綺麗な絵になっていくと思われます。
3-3. 自分で描いた絵から生成してみる
3-3-1. 生成用コードの作成
自分で描いた絵から生成させる為の、下記ファイルを作成しました。
generate.py
#!/usr/bin/env python

from __future__ import print_function
import argparse
import os

import chainer
from chainer import training

from net import Discriminator
from net import Encoder
from net import Decoder
from updater import FacadeUpdater

from facade_dataset import FacadeDataset
from facade_visualizer import out_image
import shutil


def main():
	parser = argparse.ArgumentParser(description='chainer implementation of pix2pix')
	parser.add_argument('--gpu', '-g', type=int, default=-1,
                        help='GPU ID (negative value indicates CPU)')

	parser.add_argument('--seed', type=int, default=0,
                        help='Random seed')
	parser.add_argument('--model', '-m', default='',
                        help='model snapshot')
	parser.add_argument('--input', '-i', default='sample.jpg',
                        help='input jpg')
	args = parser.parse_args()

    print('GPU: {}'.format(args.gpu))

    # Set up a neural network to train
    enc = Encoder(in_ch=3)
	dec = Decoder(out_ch=3)
	dis = Discriminator(in_ch=3, out_ch=3)

    if args.gpu >= 0:
    	chainer.cuda.get_device(args.gpu).use()  # Make a specified GPU current
        enc.to_gpu()  # Copy the model to the GPU
        dec.to_gpu()
    	dis.to_gpu()

    # Setup an optimizer
    def make_optimizer(model, alpha=0.0002, beta1=0.5):
    	optimizer = chainer.optimizers.Adam(alpha=alpha, beta1=beta1)
    	optimizer.setup(model)
    	optimizer.add_hook(chainer.optimizer.WeightDecay(0.00001), 'hook_dec')
        return optimizer

	opt_enc = make_optimizer(enc)
	opt_dec = make_optimizer(dec)
	opt_dis = make_optimizer(dis)

    if os.path.exists('generate_tmp'):
    	shutil.rmtree('generate_tmp')

	os.mkdir('generate_tmp')
	shutil.copyfile(args.input,'generate_tmp/tmp.jpg')
	test_d = FacadeDataset('generate_tmp/', 'generate_tmp/')
	test_iter = chainer.iterators.SerialIterator(test_d, 1)


    # Set up a trainer
    updater = FacadeUpdater(
        models=(enc, dec, dis),
        iterator={},
        optimizer={
            'enc': opt_enc, 'dec': opt_dec,
            'dis': opt_dis},
        device=args.gpu)
	trainer = training.Trainer(updater, (200, 'epoch'), out='generate/')
	chainer.serializers.load_npz(args.model, trainer)


	out_image(
    	updater, enc, dec,
        1, 1, args.seed, 'generate/',True,test_iter)(trainer)


if __name__ == '__main__':
	main()
また、facade_visualizer.pyの中身を少し変更します。
facade_visualizer.py
#!/usr/bin/env python

import os

import numpy as np
from PIL import Image

import chainer
import chainer.cuda
from chainer import Variable


def out_image(updater, enc, dec, rows, cols, seed, dst,generate_mode=False,test_iterator=None):
	@chainer.training.make_extension()
    def make_image(trainer):
    	np.random.seed(seed)
    	n_images = rows * cols
    	xp = enc.xp

    	w_in = 256
        w_out = 256
        in_ch = 3
        out_ch = 3

        in_all = np.zeros((n_images, in_ch, w_in, w_in)).astype("i")
    	gt_all = np.zeros((n_images, out_ch, w_out, w_out)).astype("f")
    	gen_all = np.zeros((n_images, out_ch, w_out, w_out)).astype("f")

        for it in range(n_images):
            if test_iterator!=None:
            	batch = test_iterator.next()
            else:
            	batch = updater.get_iterator('test').next()
        	batchsize = len(batch)
            print('bsize:'+str(batchsize))

        	x_in = xp.zeros((batchsize, in_ch, w_in, w_in)).astype("f")
        	t_out = xp.zeros((batchsize, out_ch, w_out, w_out)).astype("f")

            for i in range(batchsize):
            	x_in[i,:] = xp.asarray(batch[i][0])
            	t_out[i,:] = xp.asarray(batch[i][1])
        	x_in = Variable(x_in)

        	z = enc(x_in)
        	x_out = dec(z)

            if generate_mode==False:
            	in_all[it,:] = x_in.data.get()[0,:]
            	gt_all[it,:] = t_out.get()[0,:]
            	gen_all[it,:] = x_out.data.get()[0,:]
            else:
            	gen_all[it,:] = x_out.data[0,:]


        def save_image(x, name, mode=None):
        	_, C, H, W = x.shape
        	x = x.reshape((rows, cols, C, H, W))
        	x = x.transpose(0, 3, 1, 4, 2)
            if C==1:
            	x = x.reshape((rows*H, cols*W))
            else:
            	x = x.reshape((rows*H, cols*W, C))

        	preview_dir = '{}/preview'.format(dst)
        	preview_path = preview_dir +\
                '/image_{}_{:0>8}.png'.format(name, trainer.updater.iteration)
            if not os.path.exists(preview_dir):
            	os.makedirs(preview_dir)
        	Image.fromarray(x, mode=mode).convert('RGB').save(preview_path)

    	x = np.asarray(np.clip(gen_all * 128 + 128, 0.0, 255.0), dtype=np.uint8)
        print('save generated image!')
    	save_image(x, "gen")
        if generate_mode==False:

        	x = np.asarray(np.clip(in_all * 128 + 128, 0.0, 255.0), dtype=np.uint8)
        	save_image(x, "in")
            x = np.asarray(np.clip(gt_all * 128+128, 0.0, 255.0), dtype=np.uint8)
        	save_image(x, "gt")

    return make_image
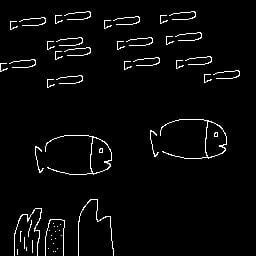
今回の目的である、適当な絵を書いてその絵から生成させてみます。
描いた絵はこちらになります。(下手ですね 笑)
3-3-2. 画像生成 実行結果
そして、実際に生成した結果がこちらです。
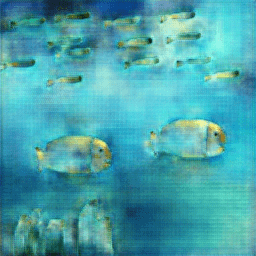
少し魚と水が同化している様な感じもしますが、絵画の様な絵が生成されました。
今回はopencvのCannyのメソッドを使って輪郭を取得しましたが、これが手書きよりも複雑な線になってしまっているので、次回はlabelデータをもう少し工夫してみたいと思います。
